Installation and Setup
Tip
Everything you need to know about what has to be installed and how to set up the project so that everything runs correctly is explained in this video: Project Setup Guide.
Note
The video is in German, so you may need to use subtitles.
First, you need to install FMOD Studio 2.02 and Engine 2.02, CARLA version 0.9.15, and Python versions 3.8 and 3.12. Use the following links to download the necessary files:
Dependencies
Component |
Version |
|---|---|
2.02 |
|
2.02 |
|
0.9.15 |
|
3.8 and 3.12 |
After the installations are complete, you can clone the repository into your IDE. You will now need to create three different virtual environments (venvs) for the project.
1. CARLA Client Venv
To set up the CARLA Client venv, navigate to the folder where Carla4UE.exe is located and open a terminal, or navigate there directly via the console.
Move into the PythonAPI\examples folder:
C:\Users\user\yourFolderWhereCarlaIs\WindowsNoEditor> cd PythonAPI\examples
Create a venv using Python 3.8:
C:\Users\user\yourFolderWhereCarlaIs\WindowsNoEditor\PythonAPI\examples> py -3.8 -m venv .venv38
Activate the venv:
C:\Users\user\yourFolderWhereCarlaIs\WindowsNoEditor\PythonAPI\examples> .\.venv38\Scripts\activate
Install the requirements.txt:
(.venv38) C:\Users\user\yourFolderWhereCarlaIs\WindowsNoEditor\PythonAPI\examples> pip install -r requirements.txt
Finally, manually install the CARLA library into the venv:
(.venv38) C:\Users\user\yourFolderWhereCarlaIs\WindowsNoEditor\PythonAPI\examples> pip install carla
You can check if everything installed correctly using pip list, then deactivate the venv.
Important
The next two venvs must be created within the src folder. Ensure you have cloned the repository before proceeding.
2. CARLA Code Venv
This venv is created in the CARLA folder of the project. This part of the code connects with CARLA and handles data transmission with the simulator.
Open a terminal in your IDE and navigate to the CARLA folder:
C:\Users\user\yourProjectFolder> cd src\CARLA
Create a venv with Python 3.8:
C:\Users\user\yourProjectFolder\src\CARLA> py -3.8 -m venv .venv38
Activate it and install the requirements:
C:\Users\user\yourProjectFolder\src\CARLA> .\.venv38\Scripts\activate

(.venv38) C:\Users\user\yourProjectFolder\src\CARLA> pip install -r requirements.txt
Once complete, deactivate the venv.
3. FMOD Code Venv
This venv is created in the FMOD folder of the project. This part of the code is responsible for triggering the sounds during the correct simulation events.
Navigate to the FMOD folder:
C:\Users\user\yourProjectFolder> cd src\FMOD
Create the venv using Python 3.12:
C:\Users\user\yourProjectFolder\src\FMOD> py -3.12 -m venv .venv38
Activate and install the requirements:
C:\Users\user\yourProjectFolder\src\FMOD> .\.venv38\Scripts\activate

(.venv38) C:\Users\user\yourProjectFolder\src\FMOD> pip install -r requirements.txt
Once complete, deactivate the venv.
Launcher
After all virtual environments (venvs) are created, you can launch the project by executing the RunOhmUXSim.py file. Initializing this script opens the Master Launcher interface.
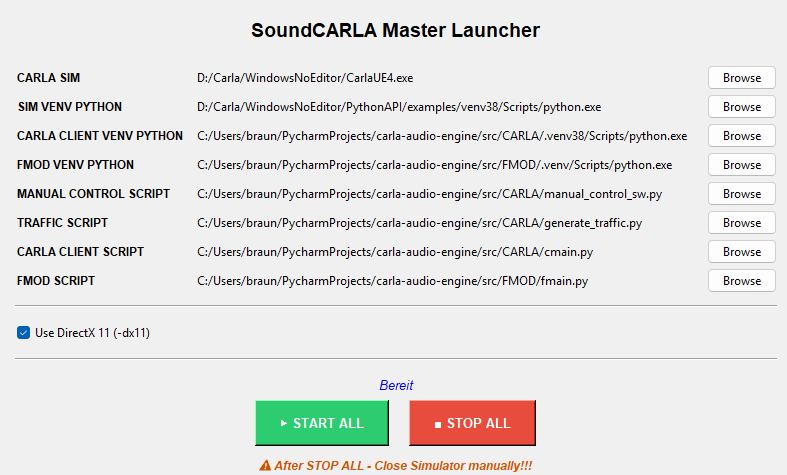
SoundCARLA Master Launcher Interface
In the launcher, you must specify the absolute paths for:
The CARLA Simulator: The main simulator executable.
The Python Interpreters: Select the specific
python.exefiles located within your respective venvs.Scripts: Define the locations for manual control, traffic generation, and the core SoundCARLA/FMOD integration scripts.
Tip
The image above provides example paths that should be structurally similar to your local setup.
Note
The Use DirectX 11 (-dx11) option should be enabled if your GPU is not an NVIDIA model or if it possesses less than 8GB of VRAM to ensure simulation stability.